My mother used to make me eat black eyed peas on New Years Day. One for each year I'd lived plus one for good luck in the coming year. I hated black eyed peas as a kid, but now I know that the secret ingredient, as with so many foods, is bacon.
2 Tbsp oil
1 carrot
1 medium yellow onion
2-4 slices of the thickest cut bacon you can find
1 head garlic
1/2 cup white wine
salt, black pepper, red pepper to taste
1/2 to 1 lb dry, presoaked, or canned black eyed peas
1. Heat the oil to medium high in a 2 quart dutch oven. Dice and add the carrot, onion, bacon, and garlic, stirring frequently to prevent burning. (In that order, with as much time in between as it takes you to cut up the next ingredient.)
2. Add the wine and spices, and reduce liquid by half.
3. Add the dry and canned, drained beans and cover with 2 inches of water. Recipe may be completed in advance up to this point.
4. Cover tightly and bake 8 hours at 200 degrees. Cooked beans will keep up to 3 days, refridgerated.
I'd never cooked beans so slow or so long before. You see, I started out with pre-soaked beans from the store, but they were moldy (bad store!). Then I substituted dry beans because we couldn't find any black eyed peas at the store on NYE, then my wonderful boyfriend found canned ones, which I threw in at the last minute. So, we ended up with a pot of half dry (and not pre-soaked) and half canned beans, and I decided our best bet would be to just cook the heck out of them. Turns out, beans are super flexible, and the dry and canned beans are both delicious cooked this way.
We're about to dig in to our black eyed peas, some collard greens cooked with ham, and a big pot of rice.
Happy New Year!
Saturday, January 1, 2011
Sunday, August 22, 2010
Rhubarb (Peach) Pie
So...I haven't posted here in a really, really long time. What can I say? I got distracted. And cooking feels like a hassle to me when I have to photograph everything. But I've been sitting on these photos for months now, and I have no excuse for failing to share this recipe.

Pie is my very favorite dessert in the world. All that fruit feels virtuous, plus it's one of those rare foods that seems daunting but is easier than it appears. Lots of people have told me they couldn't make pie. I get it. All that stuff about "cutting in" and not letting gluten form in the crust probably sounds as mysterious to a lot of folks as "proofing yeast" and not overkneading bread dough sounded to me. But just like I managed to turn out a decent loaf of bread my first time, you can do the same with pie.

This is my grandma's pie crust recipe, and she made the best pies in the world. The secret is in the liquids: vinegar, unlike water, prevents gluten from forming when you work the dough (gluten makes the crust tough and chewy), and the egg keeps the crust from falling apart when you roll it out.

Grandma Frieda's Pie Crust
3 cups flour (unbleached, all-purpose, unsifted because I'm lazy)
1 teaspoon salt
1 1/4 cups butter (or, if you can find it, fresh lard)
1 egg
1 Tablespoon vinegar
up to 5 Tablespoons ice water
1. Mix flour and salt. Dice the butter into 1/2 inch cubes (this makes the next step easier and faster, which keeps the butter colder, which prevents gluten formation).
2. Cut in the butter. You can use a pastry cutter or two knives, but I prefer to use my hands, picking up handfuls of the mixture and rubbing it between my hands. You're finished when the mixture resembles small peas.
3. Beat the egg with the vinegar and mix in. Add water 1 Tablespoon at a time until you are able to form a ball with the dough.
Yields four 8 or 9 inch crusts (two double-crusted pies), or three 10 inch crusts.
Rhubarb Pie
Saran or other plastic wrap
2 10-inch pie crusts from recipe above
7 cups rhubarb, cut into 1-inch pieces
4 tablespoons cornstarch
1 to 1 1/2 cups sugar
pinch salt
milk or egg white
1. Pre-heat the oven to 450. Place Saran wrap on counter. Dust with flour. Place one crust over it, dust with flour, and roll out. Place in a 10-inch pie plate, preferably glass.
2. In a large bowl, mix rhubarb, cornstarch, sugar, and salt. Place in pie crust.
3. Roll out second crust. You can just place it on top and poke some vents in it, but I like to make a lattice crust. Using a butter knife, cut into 3/4 inch strips. Use two of the longest strips to make a cross in the center of the pie with the vertical strip on top. Add two more horizontal strips, top and bottom, above the vertical strip. Continue to work outward to the edges of the pie, folding the strips back as needed. Here's a video, in case, like me, you can't visualize anything spatial.
4. Brush the top crust with milk or egg white. This makes it shiny and pretty.
5. Bake 10 minutes at 450. Turn the oven down to 350 and bake an additional 50 to 55 minutes, until the crust is golden. Remove from oven and let cool at least 10-15 minutes before cutting. Best still warm from the oven, but good for breakfast too.

Since rhubarb season is long over and we are right in the heart of peach season, I suggest using them instead:
7 cups peaches, peeled and sliced.
1/4 to 1/2 cup sugar
1 teaspoon lemon juice
1/2 teaspoon cinnamon
1/4 teaspoon cardamom
1/8 teaspoon nutmeg
2 1/2 Tablespoons corn starch

Tune in next time to hear about the travails of trying to eat well in a non-air-conditioned apartment. Or, why I haven't been cooking much the last few months.
Wednesday, May 12, 2010
Baked Pasta with Asparagus in Pink Sauce
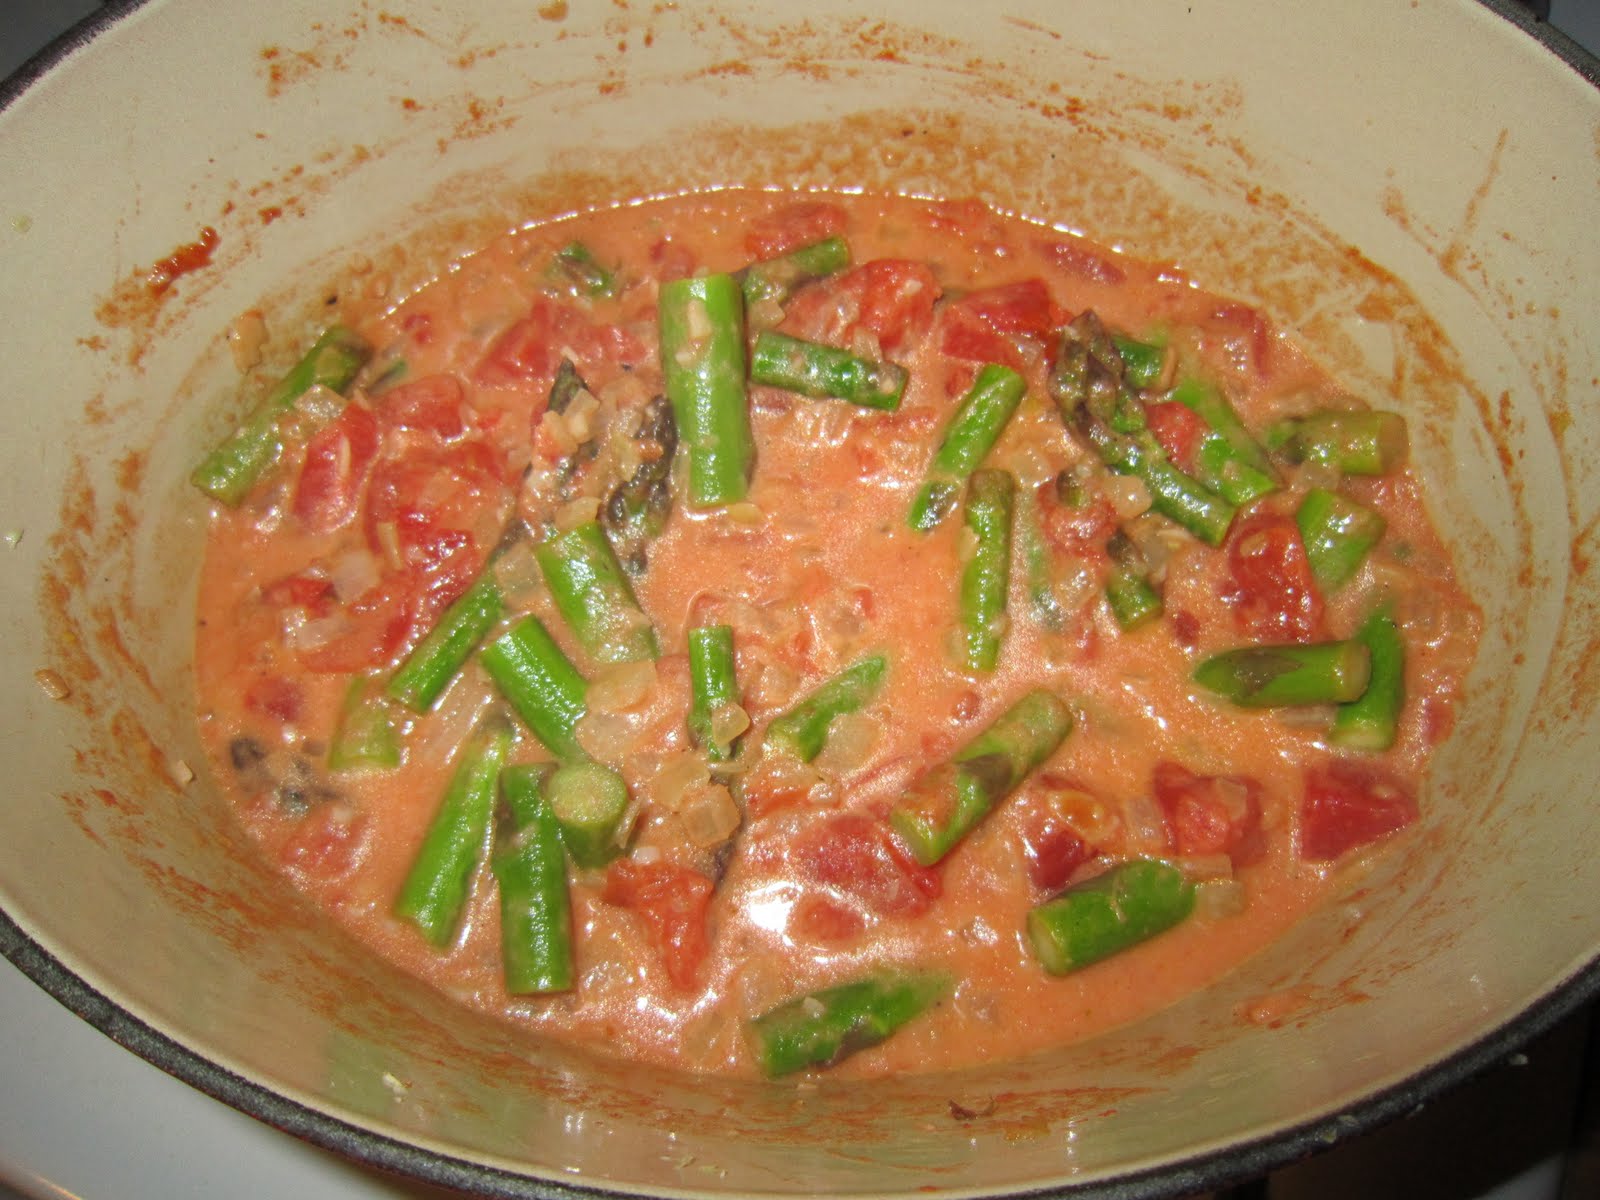
Still snowing. I'm usually not much of a pasta person, but it's a fantastic way to combine the lighter flavors of spring veggies with my cold-induced cravings for rich, creamy carbohydrates. This dish is easy enough that even my dad could make it. If, you know, he were willing to make anything that called for heavy cream.

Baked Pasta with Asparagus in Pink Sauce
Serves 4-6
1 lb dry pasta (ziti, spirals, gluten-free, whatever)
2 tablespooons olive oil
1 yellow onion
1/2 head garlic
1 lb asparagus
2 cans diced tomatoes, with their juice
1/2 c heavy cream
salt and pepper
1 c parmigiano reggiano*
4 oz mozzarella
1. Preheat your oven to 350. Fill a large pot 2/3 full with cold water, set over high heat, and cover. Set a heavy, oven-proof casserole over medium-low heat and add the oil. Dice the onion and sautee until golden in color. Meanwhile, remove the tough ends from the asparagus and cut it into bite-sized pieces, and mince the garlic. Add them to the pan, and sautee 3 minutes.
2. Add the tomatoes and cream and bring to a simmer. Add about 3/4 of the parmigiano cheese and stir it in, then add salt and pepper to taste. Reduce heat to low.
3. Add the pasta to the boiling water along with a generous amount of salt. Cook according to package directions. Meanwhile, stir the sauce frequently and grate the remaining cheese. When the pasta is done, strain it and add it to the casserole with the sauce. Stir.
4. Sprinkle the mozzarella cheese and the rest of the parmigiano over the pasta/sauce mixture, and bake for 10 minutes to melt the cheese.
*The real stuff is stamped on the rind. Don't use the pre-grated gross stuff. You can substitute pecorino romano if you can't have cow-milk cheeses, but as it is much saltier and more pungent than parmigiano you'll want to cut down on the salt and use less.
Tuesday, May 11, 2010
Pork Chops with Apple Chutney and Roasted Sweet Potatoes
A classic dish, ever so slightly modernized. I love apples with savory pork products and make all sorts of variations on the apples and pork combo every fall. (Okay, 90% of this is apples sauteed in bacon lard, but whatever.) I realize that it's May, but it's supposed to snow tonight, so cold-weather food feels appropriate.
I've ordered the recipes for this meal in the order you should start preparing them. Sauce comes first, because it's easy to keep warm if it's done too early. Start by preheating your oven to 400.

Apple Chutney
Serves 4
I'll confess, I've never made this before, but I wanted to get apples and onions into one dish, so here's what I came up with.
1 tablespoon olive oil
1 medium onion, diced
2 apples, cored and sliced*
2 tablespoons red wine vinegar
1 cup water
2 tablespoons plus one pinch sugar (I prefer brown, but white works too)
1 teaspoon cinnamon
1/2 teaspoon salt
1/8 teaspoon cayenne
1. Heat the olive oil over low-medium heat in a medium saucepan while you dice the onions. Saute the onions with a pinch of sugar (to help them carmelize) until they are golden in color, stirring frequently.
2. Add the remaining ingredients, reduce heat to low, and simmer, stirring frequently until the apples are mushy, 20 minutes minimum, or up to 40 depending on how mushy you like your sauce.
*I personally like the texture of the skins, so I leave them on. Peel if you wish, but you're sacrificing flavor for texture.

Roasted Sweet Potatoes
Once the sauce is simmering, cut up 1 sweet potato per person. Toss in olive oil, salt, pepper, and a pinch of sugar. Roast at 400 until tender, at least 20 minutes or up to 40.

Pork Chops
4 center-cut pork chops
salt and pepper
flour for dredging
2 tablespoons grapeseed or canola oil
Find the fattiest pork you can. If you must use supermarket pork, try marinating it for up to 4 hours in salted milk, as this will help make it tender.
Rub the pork with salt and pepper, dip it in milk, and dredge it in flour. Heat oil over high heat, then add the pork and cook until golden on both sides. Reduce the heat to medium-low and cook, turning once or twice, until it reaches an internal temperature of 140** and, if cut into, is slightly pink with clear-running juices.
**The FDA recommends cooking pork to 160, but don't listen to them unless you're pregnant, have a weakened immune system, or like extremely tough meat.

I finished off my meal with braised spinach.
Monday, May 3, 2010
Weeknight Coq au Vin
 I love Coq au Vin, but most recipes turn it into an event. Here's a version that's simple enough to put together on a weeknight.
I left work at 5; dinner was on the table by 7, even though I putzed around a bit.

I served this with packet asparagus* and roasted potatoes.**

*Cut the tough ends off, season with salt, pepper, thyme, and a squeeze of lemon juice, spread in 1-2 layers and wrap in foil, bake in oven at 200 for one hour.
**Cut into bite-sized pieces, toss with salt, pepper, and olive oil, spread in a single layer and cook in a 400 degree oven for 20-40 minutes.

4 tablespoons bacon fat (or 2 each of olive oil and butter)
2 breasts and two whole legs of chicken
flour
1/2 lb mushrooms, sliced
2 onions, finely diced
4 cloves garlic, minced
salt, pepper, thyme
1 can diced tomatoes
1 c dry red wine
1/2 c stock (beef is traditional, I used goat, chicken would also work)
Heat 2 tablespoons of the fat over medium-high heat in a large pan for which you have a cover. Season the chicken with salt and pepper and dredge it with flour. Add it to the pan, one piece at a time so the temperature of the oil doesn't drop too much, and brown on all sides. Remove, set aside, and wipe out the pan.
Decrease the heat to medium. Add the remaining fat to the pan and, when it is hot, add the sliced mushrooms. Cook until they brown, about 5 minutes. Add the onions, garlic, salt, pepper, and thyme. Cook until the onions are translucent and beginning to turn golden, 5-7 minutes. Add the tomatoes and stock and cook, stirring, until they break up, 5 minutes. Add the wine and chicken, cover the pan, and reduce heat to med-low. Cook an additional 20-30 minutes, turning every 5 minutes.
**One can also omit the chicken, double the recipe, and serve the mushroom sauce over rice. I've done it, for vegetarians.

Wednesday, April 14, 2010
German Pancakes

How brilliant is it to bake pancakes in the oven so you can crawl back into bed until they're ready instead of having to stand over a stove and flip them? Germans are awesome.

These are significantly eggier than regular pancakes, more like thick crepes. It's fun to watch them get all puffy in the oven.

German Pancakes
from Smitten Kitchen
Yields 2 9-inch pancakes (feeds two, generously)
4 eggs
1 tablespoon sugar
1/2 teaspoon salt
2/3 cup all-purpose flour
2/3 cup whole milk
2 tablespoons soft butter
Heat oven to 375°F. Butter two 9-inch round cake pans well. (As in, 1 tablespoon per pan.) Blend eggs at low speed in blender until they become light yellow. Increase speed to low-medium, remove cover and add remaining ingredients; process until smooth. Pour into buttered pans and bake 20 minutes; then reduce heat to 325°F and bake 10 minutes.
Traditionally, these are served with lemon slices, powdered sugar, and butter, but I like them piled with fresh or stewed seasonal fruit, and most others seem to prefer maple syrup.
Salsas: Rojo, Verde, Ranchero
I'd been thinking about doing a Mexican feast for a few weeks. At this time of year, avocados and limes and mangoes are cheap and nothing local is really in season yet. Plus I'm generally sick of wintery foods and want something brighter. So I'd been toying with the idea, but didn't quite know how to get around the lack of decent tomatoes. Then, on St. Patrick's Day, the New York Times posted this article on authentic Mexican salsas. I was inspired.

Each salsa is very different than the others, and each recipe yields about 1 quart of salsa.
First, the salsa roja was a disappointment. I love cinnamon, but this was just too cinnamony for my taste. Instead of providing background sweetness, the canela dominated the dish. However, I have found a way to use it, as I'll explain in a later post.

Salsa Roja
Adapted from the NY Times
2 pounds roma tomatoes (or 1 28-ounce can stewed tomatoes)
3 tablespoons light olive oil
4-8 dried chiles de arbol (or Thai or pequin)
1 small, sliced yellow onion
1 clove peeled garlic
6 whole cloves
1/2 piece Mexican canela
1/4 teaspoon salt
3 tablespoons grape seed oil
2 pounds tomatillos, husks removed, halved
6 to 12 serrano chilies, stems and seeds removed*
1/2 onion, peeled
1 clove garlic, also peeled*
12 whole sprigs cilantro, stems included (about a handful)
juice of 3-6 limes
Salt
*I used six and found the salsa to be well-balanced: it had enough heat to be kicky, but not so much I couldn't taste the other flavors.
*I substituted four green garlics.
1. In a wide skillet, heat oil until shimmering but not smoking. Add tomatillos, chilies, onion (cut side down) and garlic. Cook over medium-high heat, turning often, until vegetables are browned, turning to black (I got distracted, and mine turned black, to no negative effect), and seared on all sides.
1/4 oz dried guajillo or New Mexico chiles
1/4 oz dried ancho chiles
6 roma tomatoes
2/ cloves garlic
3/4 cup diced onion
1 teaspoon ground cumin
1 poblano chile, roasted, stemmed, seeded and diced*
salt
*I may have not read the recipe closely and diced my poblano without roasting it, then seared it in a dry pan over high heat. Although this meant I couldn't remove the skins and they were a bit tough at first, after a few hours you couldn't tell the difference.
Cover dried chiles with boiling water and let steep until tender, 1 to 3 hours. Drain off and reserve soaking water. Purée chilies in a blender or food processor, adding soaking water as needed to make a smooth paste. (The longer you can soak the chiles, the less water you will need and the easier this process will be.) Strain to remove skin bits and set aside.

Each salsa is very different than the others, and each recipe yields about 1 quart of salsa.
First, the salsa roja was a disappointment. I love cinnamon, but this was just too cinnamony for my taste. Instead of providing background sweetness, the canela dominated the dish. However, I have found a way to use it, as I'll explain in a later post.

Salsa Roja
Adapted from the NY Times
2 pounds roma tomatoes (or 1 28-ounce can stewed tomatoes)
3 tablespoons light olive oil
4-8 dried chiles de arbol (or Thai or pequin)
1 small, sliced yellow onion
1 clove peeled garlic
6 whole cloves
1/2 piece Mexican canela
1/4 teaspoon salt
If using fresh tomatoes, place in a pot with water to cover and simmer 15 minutes. Drain and puree in the blender.
In a skillet, heat oil until shimmering. Add chiles, onion, garlic, cloves and canela (or spices), sprinkle with salt and cook over medium-low heat, stirring, until softened and golden, about 8 minutes. Add tomato purée or canned tomatoes and simmer, stirring often, until thickened and slightly sweet, about 15 minutes. Taste and add more salt if needed, keeping in mind that cold food tastes saltier than hot food. Puree in the blender until smooth.
Next, the salsa verde was delicious and light, and was excellent on fish a few days later. Salsa Verde
3 tablespoons grape seed oil
2 pounds tomatillos, husks removed, halved
6 to 12 serrano chilies, stems and seeds removed*
1/2 onion, peeled
1 clove garlic, also peeled*
12 whole sprigs cilantro, stems included (about a handful)
juice of 3-6 limes
Salt
*I used six and found the salsa to be well-balanced: it had enough heat to be kicky, but not so much I couldn't taste the other flavors.
*I substituted four green garlics.
1. In a wide skillet, heat oil until shimmering but not smoking. Add tomatillos, chilies, onion (cut side down) and garlic. Cook over medium-high heat, turning often, until vegetables are browned, turning to black (I got distracted, and mine turned black, to no negative effect), and seared on all sides.
2. Add cilantro (and garlic greens) and purée with blender until smooth and creamy, adding a little water if needed to loosen. Season to taste with salt and lime juice. The sauce should be tart and spicy but rounded in flavor.
Finally, the salsa ranchera was the favorite. I believe it would have been excellent with huevos for breakfast, but sadly, there were no leftovers.
Salsa Ranchera
1/4 oz dried guajillo or New Mexico chiles
1/4 oz dried ancho chiles
6 roma tomatoes
2/ cloves garlic
3/4 cup diced onion
1 teaspoon ground cumin
1 poblano chile, roasted, stemmed, seeded and diced*
salt
*I may have not read the recipe closely and diced my poblano without roasting it, then seared it in a dry pan over high heat. Although this meant I couldn't remove the skins and they were a bit tough at first, after a few hours you couldn't tell the difference.
Cover dried chiles with boiling water and let steep until tender, 1 to 3 hours. Drain off and reserve soaking water. Purée chilies in a blender or food processor, adding soaking water as needed to make a smooth paste. (The longer you can soak the chiles, the less water you will need and the easier this process will be.) Strain to remove skin bits and set aside.
2. In a pot, combine tomatoes, garlic, 1/2 cup onion, cumin, 2 tablespoons of chile puree, and 1/2 cup water. Simmer 10 minutes. Purée in a blender, then pour into a skillet.
3. Bring to a simmer and stir in remaining 1/4 cup chopped onion, diced poblano chili and salt to taste. Let simmer another few minutes to help flavors blend.
Subscribe to:
Posts (Atom)